
Almalinuxでメールサーバを構築する手順のメモ
PostfixとDovecotを利用する
概要
メールサーバを構築して独自ドメインでメールの送受信ができるようになることを目指します。
- 独自ドメインでメールの送受信を可能にする
- Gmailを利用して独自ドメインメールを送信元として送れる
- Gmailから独自ドメインメールが受信したメールが確認できる
Gmailを利用するのは、使い慣れているGmailを使いたかったためです。
設計
送受信について
- サーバー証明書(Let's Encrypt)を利用してメールサーバー間通信内容暗号化
送信
- Postfixを利用
- OP25B対策としてGmail経由(TCP587)で送信
- Gmailの設定により、Gmailから送信元を独自ドメインメールにして送信する
(※メールサーバをSMTPサーバとしてTCP465で経由させる)
受信
- Dovecotを利用
- POP(TCP995)のみ利用する
- Gmailのみで確認できれば良いので、IMAP(TCP993)は利用しない
- Gmailの設定により、Gmailから独自ドメインメール宛てのメールを確認する
環境
- AlmaLinux release 9.1 (Lime Lynx)
- Postfix 3.5.9
- Dovecot 2.3.16
- ESXi7.0(ホスト)
# cat /etc/redhat-releasecat /etc/redhat-release
AlmaLinux release 9.1 (Lime Lynx)

# postconf | grep mail_version
mail_version = 3.5.9

# dovecot --version
2.3.16 (7e2e900c1a)
事前設定
メールサーバの設定をしていく前に、前提として以下のような設定がされていること
- インターフェース設定
- プライベートIPアドレス:192.168.0.1/24
- デフォルトゲートウェイやDNSを設定してインターネット通信が可能
- 独自ドメインを取得(tatsuya-k.ml)
DNSレコード登録
メールアドレスのドメイン「tatsuya-k.ml」に対して、メールサーバは「mail.tatsuya-k.ml」であるため、DNSのMXレコードを以下のように設定します。
また、「mail.tatsuya-k.ml」のAレコードに外部からアクセスするためのグローバルIPアドレスも登録します。
# dig tatsuya-k.ml mx
tatsuya-k.ml.           xxxx    IN      MX      0 mail.tatsuya-k.ml.

# dig mail.tatsuya-k.ml
mail.tatsuya-k.ml.      xxxx    IN      A       <グローバルIPアドレス>
サーバー証明書取得
サーバー証明書取得で、Let's Encryptの無料サーバー証明書を利用します。
Let's Encryptのサーバー証明書の発行から導入はCertbotを使用します。
Certbotクライアントインストール
dnf用EPELリポジトリインストール
[root@localhost ~]# dnf -y install epel-releasesnapdインストール
[root@localhost ~]# dnf -y install snapdsnapd.socket有効化
[root@localhost ~]# systemctl enable --now snapd.socket/var/lib/snapd/snapから/snapへリンクを張る
[root@localhost ~]# ln -s /var/lib/snapd/snap /snapcertbotインストール
[root@localhost ~]# snap install --classic certbot/snap/bin/certbotから/usr/bin/certbotへリンクを張る
[root@localhost ~]# ln -s /snap/bin/certbot /usr/bin/certbotサーバー証明書取得実行
今回作成しているメールサーバはWebサーバ(Apache等)として動作していません。
サーバ名の認証をWeb経由で行うため、外部からメールサーバにWebアクセス(TCP80・443)ができるようにする必要があります。
ポート解放されていない場合、TCP80番と443番の開放をしてから、以下コマンドを実行します。
certbot certonly -a standalone -m メールアドレス -d メールサーバー名 --agree-tosEX
メールアドレス:任意のメールアドレス([email protected])
メールサーバ名:mail.tatsuya-k.ml
[root@localhost ~]# certbot certonly -a standalone -m [email protected] -d mail.tatsuya-k.ml --agree-tos
Saving debug log to /var/log/letsencrypt/letsencrypt.log
- - - - - - - - - - - - - - - - - - - - - - - - - - - - - - - - - - - - - - - -
Would you be willing, once your first certificate is successfully issued, to
share your email address with the Electronic Frontier Foundation, a founding
partner of the Let's Encrypt project and the non-profit organization that
develops Certbot? We'd like to send you email about our work encrypting the web,
EFF news, campaigns, and ways to support digital freedom.
- - - - - - - - - - - - - - - - - - - - - - - - - - - - - - - - - - - - - - - -
(Y)es/(N)o: N   << 一度目はメールアドレスにお知らせを送る要否なので、どちらでも問題ないです
Account registered.
Requesting a certificate for mail.tatsuya-k.ml

Successfully received certificate.
Certificate is saved at: /etc/letsencrypt/live/mail.tatsuya-k.ml/fullchain.pem
Key is saved at:         /etc/letsencrypt/live/mail.tatsuya-k.ml/privkey.pem
This certificate expires on 2023-07-29.
These files will be updated when the certificate renews.
Certbot has set up a scheduled task to automatically renew this certificate in the background.

- - - - - - - - - - - - - - - - - - - - - - - - - - - - - - - - - - - - - - - -
If you like Certbot, please consider supporting our work by:
 * Donating to ISRG / Let's Encrypt:   https://letsencrypt.org/donate
 * Donating to EFF:                    https://eff.org/donate-le
- - - - - - - - - - - - - - - - - - - - - - - - - - - - - - - - - - - - - - - -
Postfix
Postfixインストール
[root@localhost ~]# dnf -y install postfix「/etc/postfix/main.cf」編集
viを利用し「/etc/postfix/main.cf」編集する。
[root@localhost ~]# vi /etc/postfix/main.cf-
DNS の MX レコードに登録したホスト名を設定
メールサーバのホスト名と異なるホスト名を使用したいので、明示的に設定します。# INTERNET HOST AND DOMAIN NAMES # # The myhostname parameter specifies the internet hostname of this # mail system. The default is to use the fully-qualified domain name # from gethostname(). $myhostname is used as a default value for many # other configuration parameters. # #myhostname = host.domain.tld #myhostname = virtual.domain.tld myhostname = mail.tatsuya-k.ml << 追加 -
ドメイン名設定
# The mydomain parameter specifies the local internet domain name. # The default is to use $myhostname minus the first component. # $mydomain is used as a default value for many other configuration # parameters. # #mydomain = domain.tld mydomain = tatsuya-k.ml << 追加 -
送信元メールアドレス@以降にドメイン名を付加する設定
ローカルからのメール送信時の送信元メールアドレス@以降にドメイン名を付加するための設定をします。# SENDING MAIL # # The myorigin parameter specifies the domain that locally-posted # mail appears to come from. The default is to append $myhostname, # which is fine for small sites. If you run a domain with multiple # machines, you should (1) change this to $mydomain and (2) set up # a domain-wide alias database that aliases each user to # [email protected]. # # For the sake of consistency between sender and recipient addresses, # myorigin also specifies the default domain name that is appended # to recipient addresses that have no @domain part. # #myorigin = $myhostname #myorigin = $mydomain myorigin = $mydomain << 追加 -
独自ドメイン宛メールを受信できるようにする設定
# The mydestination parameter specifies the list of domains that this # machine considers itself the final destination for. # ~ 中略 ~ # # Specify a list of host or domain names, /file/name or type:table # patterns, separated by commas and/or whitespace. A /file/name # pattern is replaced by its contents; a type:table is matched when # a name matches a lookup key (the right-hand side is ignored). # Continue long lines by starting the next line with whitespace. # # See also below, section "REJECTING MAIL FOR UNKNOWN LOCAL USERS". # #mydestination = $myhostname, localhost.$mydomain, localhost << コメントアウト追加 mydestination = $myhostname, localhost.$mydomain, localhost, $mydomain << コメントアウト削除 #mydestination = $myhostname, localhost.$mydomain, localhost, $mydomain, #mail.$mydomain, www.$mydomain, ftp.$mydomain -
メール格納形式をMaildir形式にする設定
アクセス性能改善及びセキュリティ強化の観点からMaildir形式にする。# DELIVERY TO MAILBOX # # The home_mailbox parameter specifies the optional pathname of a # mailbox file relative to a user's home directory. The default # mailbox file is /var/spool/mail/user or /var/mail/user. Specify # "Maildir/" for qmail-style delivery (the / is required). # #home_mailbox = Mailbox home_mailbox = Maildir/ << コメントアウト削除 -
メールサーバーソフト名の隠蔽化設定
# SHOW SOFTWARE VERSION OR NOT # # The smtpd_banner parameter specifies the text that follows the 220 # code in the SMTP server's greeting banner. Some people like to see # the mail version advertised. By default, Postfix shows no version. # # You MUST specify $myhostname at the start of the text. That is an # RFC requirement. Postfix itself does not care. # #smtpd_banner = $myhostname ESMTP $mail_name #smtpd_banner = $myhostname ESMTP $mail_name ($mail_version) smtpd_banner = $myhostname ESMTP unknown << 追加 -
サーバー証明書+中間証明書と秘密鍵の設定
先ほど作成した証明書と秘密鍵のパスを設定します。パスは以下です。
- サーバー証明書+中間証明書:/etc/letsencrypt/live/mail.tatsuya-k.ml/fullchain.pem
- 秘密鍵:/etc/letsencrypt/live/mail.tatsuya-k.ml/privkey.pem
# The full pathname of a file with the Postfix SMTP server RSA certificate
# in PEM format. Intermediate certificates should be included in general,
# the server certificate first, then the issuing CA(s) (bottom-up order).
#
#smtpd_tls_cert_file = /etc/pki/tls/certs/postfix.pem
smtpd_tls_cert_file = /etc/letsencrypt/live/mail.tatsuya-k.ml/fullchain.pem  << 追加

# The full pathname of a file with the Postfix SMTP server RSA private key
# in PEM format. The private key must be accessible without a pass-phrase,
# i.e. it must not be encrypted.
#
#smtpd_tls_key_file = /etc/pki/tls/private/postfix.key
smtpd_tls_key_file = /etc/letsencrypt/live/mail.tatsuya-k.ml/privkey.pem  << 追加
※以降の設定は、最終行に追加していくこと
-
SMTP認証設定
smtpd_sasl_auth_enable = yes smtpd_recipient_restrictions = permit_mynetworks permit_sasl_authenticated reject_unauth_destination -
受信メールサイズ制限
EX ) 受信メールサイズを10MB=10×1024×1024に制限するmessage_size_limit = 10485760 -
存在しないユーザー宛メールをunknown_userへ配送
悪意のある迷惑メールにより、存在しないユーザ宛てに送られる可能性がある。
結果として、キューが溜まりサーバが高負荷状態になる可能性が考えられるため、存在しないユーザ宛てのメールは破棄をする。
以下設定を、「/etc/postfix/main.cf」への追加と、「存在しないユーザ宛てメール破棄するためのaliases変更」を行う必要がある。local_recipient_maps = luser_relay = unknown_user@localhost -
メールサーバーのOP25B対策
Gmail経由でメールの送信を行うように設定する。relayhost = [smtp.gmail.com]:587 smtp_use_tls = yes smtp_sasl_auth_enable = yes smtp_sasl_password_maps = hash:/etc/postfix/sasl_passwd smtp_sasl_tls_security_options = noanonymous smtp_sasl_mechanism_filter = plain smtpd_tls_session_cache_database = btree:/var/lib/postfix/smtpd_scache -
脆弱性のある暗号化方法を除外・無効化
# 除外
tls_high_cipherlist = kEECDH:+kEECDH+SHA:kEDH:+kEDH+SHA:+kEDH+CAMELLIA:kECDH:+kECDH+SHA:kRSA:+kRSA+SHA:+kRSA+CAMELLIA:!aNULL:!eNULL:!SSLv2:!RC4:!MD5:!DES:!EXP:!SEED:!IDEA:!3DES
smtp_tls_ciphers = high
smtpd_tls_ciphers = high
smtpd_tls_mandatory_ciphers = high
# 無効化
smtpd_tls_mandatory_protocols=!SSLv2,!SSLv3
smtp_tls_mandatory_protocols=!SSLv2,!SSLv3
smtpd_tls_protocols=!SSLv2,!SSLv3
smtp_tls_protocols=!SSLv2,!SSLv3
「/etc/postfix/master.cf」編集
viを利用し「/etc/postfix/master.cf」編集する。
[root@localhost ~]# vi /etc/postfix/master.cf- SMTPS有効化
以下3行のコメントアウトを削除して、SMTPS有効化します。smtps inet n - n - - smtpd -o smtpd_tls_wrappermode=yes -o smtpd_sasl_auth_enable=yes
SMTP認証設定
cyrus-saslインストール
[root@localhost ~]# dnf -y install cyrus-saslsaslauthd起動+自動起動
[root@localhost ~]# systemctl start saslauthd
[root@localhost ~]# systemctl enable saslauthd
新規ユーザ設定
-
Maildir形式のメールボックス自動作成
ユーザを作成時に、Maildir形式のメールボックスが自動作成するように設定する。[root@localhost ~]# mkdir -p /etc/skel/Maildir/{new,cur,tmp} [root@localhost ~]# chmod -R 700 /etc/skel/Maildir/ -
メール新規ユーザー追加
メールユーザとして、新規に作成する場合、サーバへのSSHは不要である。
サーバへのSSH接続はできないようにする。EX
メール新規ユーザー名:new_test
メールアドレス:[email protected][root@localhost ~]# useradd -s /sbin/nologin new_test [root@localhost ~]# passwd new_test Changing password for user new_test. New password: << パスワード設定 Retype new password: << パスワード設定(確認用) passwd: all authentication tokens updated successfully.
既存ユーザ設定
既存ユーザでメールの送受信を行いたい場合は、既存ユーザのhomeディレクトリにMaildir形式のメールボックスを作成します。
EX ) ユーザ名:test
[test@localhost ~]# mkdir -p /home/test/Maildir/{new,cur,tmp}
[test@localhost ~]# chmod -R 700 /home/test/Maildir/
存在しないユーザ宛てメール破棄するためのaliases変更
[root@localhost ~]# echo unknown_user: /dev/null >> /etc/aliases
[root@localhost ~]# newaliases  << 変更反映
Postfix起動+自動起動
[root@localhost ~]# systemctl restart postfix
[root@localhost ~]# systemctl enable postfix
Dovecot
Dovecotインストール
[root@localhost ~]# dnf -y install dovecot「/etc/dovecot/conf.d/10-mail.conf」編集
viを利用し「/etc/dovecot/conf.d/10-mail.conf」編集する。
[root@localhost ~]# vi /etc/dovecot/conf.d/10-mail.conf-
メール格納形式をMaildir形式にする
# Location for users' mailboxes. The default is empty, which means that Dovecot # tries to find the mailboxes automatically. This won't work if the user # doesn't yet have any mail, so you should explicitly tell Dovecot the full # location. ~ 中略 ~ # See doc/wiki/Variables.txt for full list. Some examples: # # mail_location = maildir:~/Maildir # mail_location = mbox:~/mail:INBOX=/var/mail/%u # mail_location = mbox:/var/mail/%d/%1n/%n:INDEX=/var/indexes/%d/%1n/%n # # <doc/wiki/MailLocation.txt> # #mail_location = mail_location = maildir:~/Maildir << 追加 -
メール格納形式をMaildir形式にする
# Valid UID range for users, defaults to 500 and above. This is mostly
# to make sure that users can't log in as daemons or other system users.
# Note that denying root logins is hardcoded to dovecot binary and can't
# be done even if first_valid_uid is set to 0.
#first_valid_uid = 1000  << コメントアウト追加
first_valid_uid = 500    << 追加
#last_valid_uid = 0
「/etc/dovecot/conf.d/10-auth.conf」編集
viを利用し「/etc/dovecot/conf.d/10-auth.conf」編集して、プレインテキスト認証を許可する。
[root@localhost ~]# vi /etc/dovecot/conf.d/10-auth.conf
~中略~
# Disable LOGIN command and all other plaintext authentications unless
# SSL/TLS is used (LOGINDISABLED capability). Note that if the remote IP
# matches the local IP (ie. you're connecting from the same computer), the
# connection is considered secure and plaintext authentication is allowed.
# See also ssl=required setting.
#disable_plaintext_auth = yes
disable_plaintext_auth = no  << 追加
「/etc/dovecot/conf.d/10-ssl.conf」編集
viを利用し「/etc/dovecot/conf.d/10-ssl.conf」編集する。
[root@localhost ~]# /etc/dovecot/conf.d/10-ssl.conf-
TLS通信の有効化
# SSL/TLS support: yes, no, required. <doc/wiki/SSL.txt> # disable plain pop3 and imap, allowed are only pop3+TLS, pop3s, imap+TLS and imaps # plain imap and pop3 are still allowed for local connections #ssl = required ssl = yes << 追加 -
証明書・秘密鍵設定
# PEM encoded X.509 SSL/TLS certificate and private key. They're opened before
# dropping root privileges, so keep the key file unreadable by anyone but
# root. Included doc/mkcert.sh can be used to easily generate self-signed
# certificate, just make sure to update the domains in dovecot-openssl.cnf
#ssl_cert = </etc/pki/dovecot/certs/dovecot.pem
#ssl_key = </etc/pki/dovecot/private/dovecot.pem
# サーバー証明書+中間証明書を設定
ssl_cert = </etc/letsencrypt/live/mail.tatsuya-k.ml/fullchain.pem << 追加
# 秘密鍵を設定
ssl_key = </etc/letsencrypt/live/mail.tatsuya-k.ml/privkey.pem << 追加
Dovecot起動+自動起動
[root@localhost ~]# systemctl restart dovecot
[root@localhost ~]# systemctl enable dovecot
ポート開放
以下のポートを開放する。
- 外部 → メールサーバ
TCP25
TCP465
TCP995 - メールサーバ → 外部
TCP587
Gmail連携
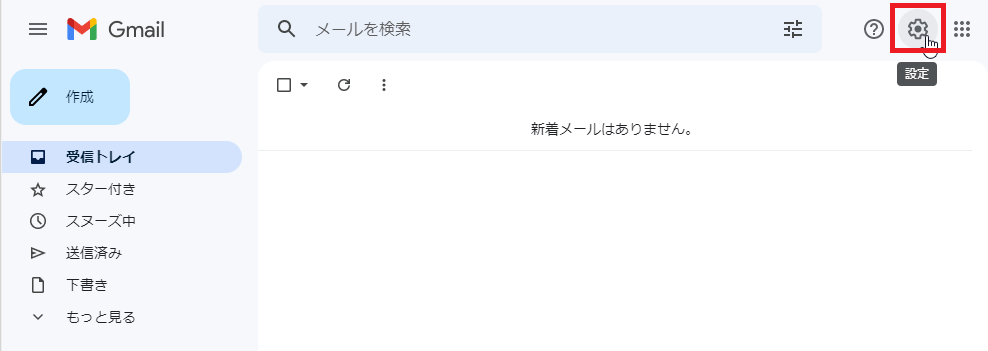
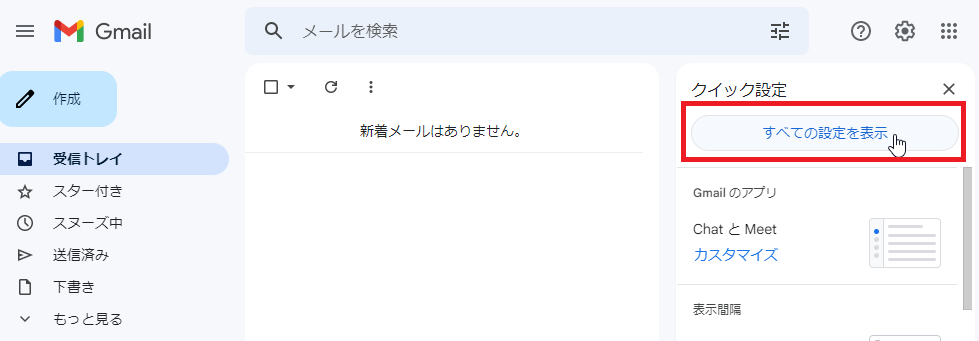
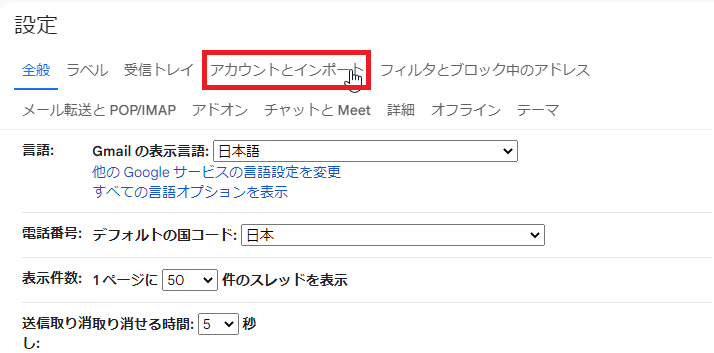
設定画面へ遷移
[設定]を押下
[すべての設定を表示]を押下
[アカウントとインポート]を押下
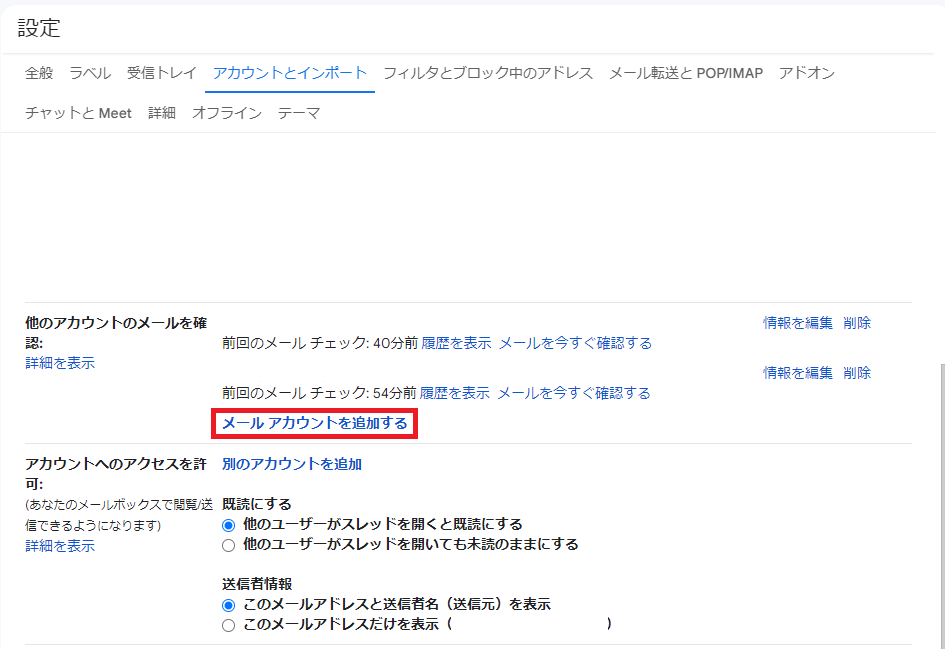
メールアカウントの追加
メールアカウントの追加をすることで、Gmail上からメールサーバに接続をしてメールを所得して、確認できるようにする。
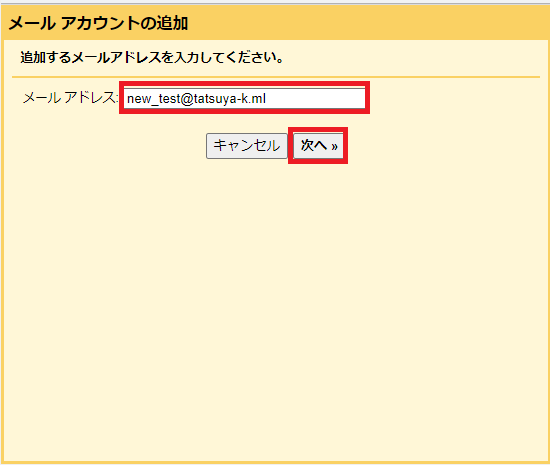
[他のアカウントのメールを確認] > [メールアカウントを追加する]を押下。
ポップアップが出るので、追加するメールアドレスを入力して[次へ]を押下。
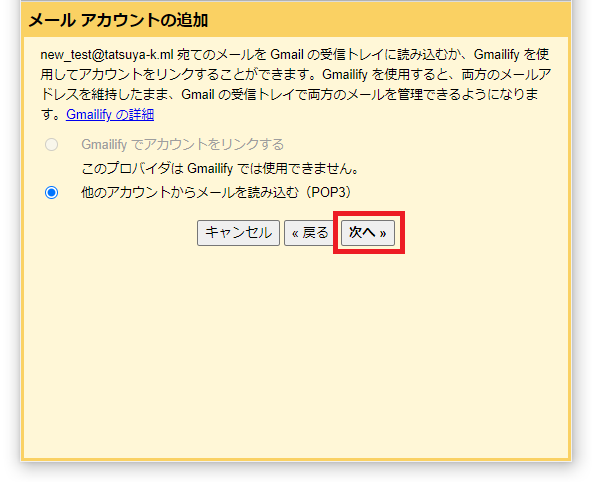
[他のアカウントからメールを読み込む(POP3)]であることを確認して[次へ]を押下。
ユーザ名、パスワード、POPサーバ(DNSに登録したMXレコード)を入力する。
ポートは[995]を選択する。
[メールの取得にセキュリティで保護された接続(SSL)を使用する]にチャックを入れる。
※その他のチャックは、任意で付けること。
上記入力後、[アカウントを追加]を押下。
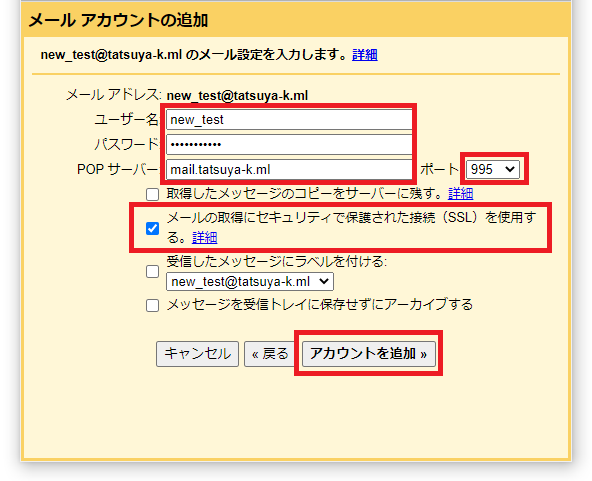
[メールアカウントを追加しました。]と表示されれば完了。
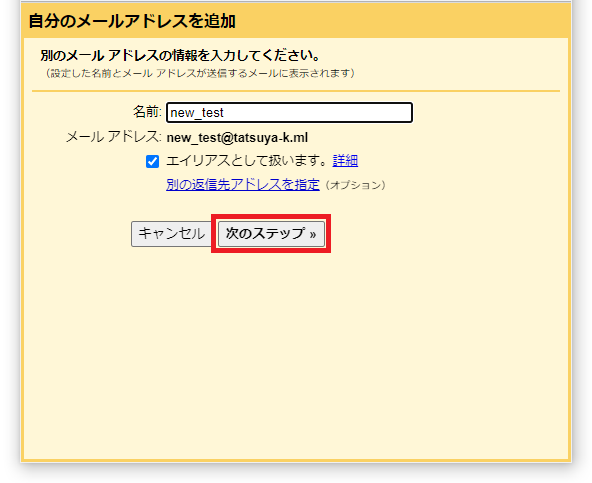
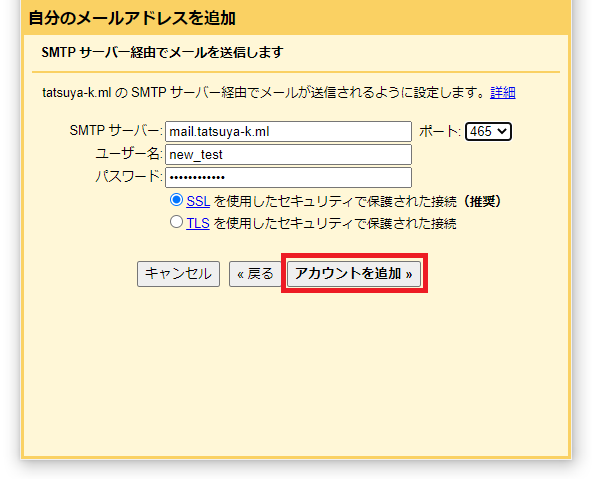
Gmailから送信元を指定可能にする
[メールアカウントを追加しました。]と表示されると、そのまま送信の設定に進むことが可能です。
[はい。]にチェックが入っていることを確認して、[次へ]を押下。

メール送信時に名前として表示される部分を任意に入力して、[次のステップ]を押下。
SMTPサーバ(DNSに登録したMXレコード)、ユーザ名、パスワードを入力する。
ポートは[465]を選択する。
上記入力後、[アカウントを追加]を押下。
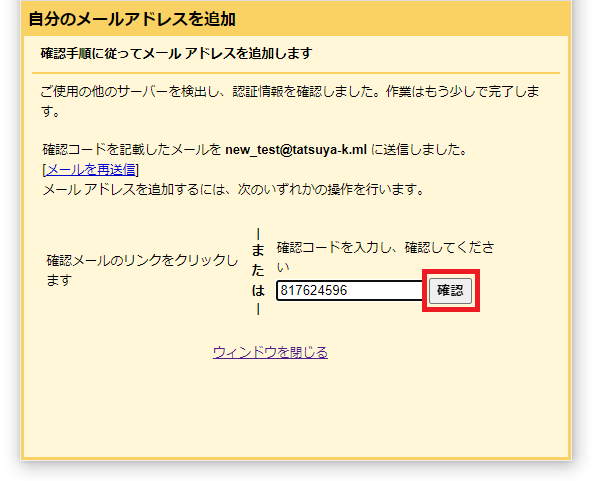
前項でGmailからメールを確認できるようにしたので、件名「Gmailからのご確認 - ~」のメールから確認コードを確認する。

確認した確認コードを入力して、[確認]を押下。
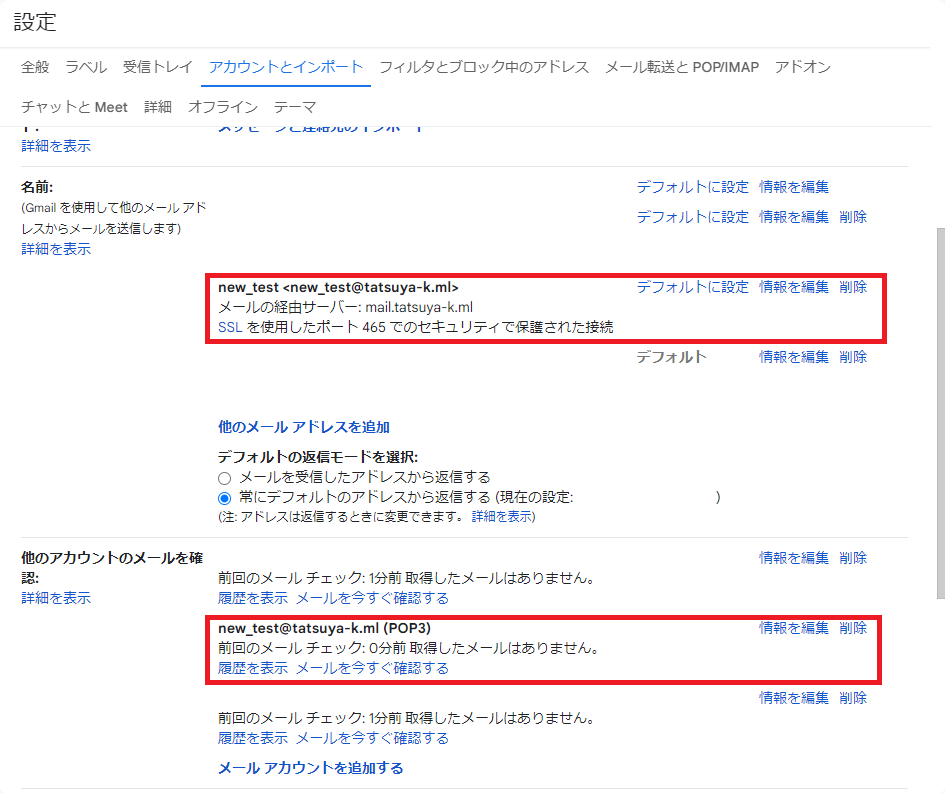
送信設定と、全項目のメールの確認設定ができていることが確認できます。
メールの確認
以下の観点でメールの送受信を行い、問題がなければ完成です。
-
送信
Gmailから、送信時に送信元メールアドレス([email protected])を選択して外部に送信が可能 -
受信
外部アドレスから、設定したメールアドレス([email protected])へメールを送信して、Gmail上から受信確認が可能
メーラーとしてGmailを使用していると、Gmailがメールサーバからメールを取得するタイミング(POP3ポーリング間隔)が非常に不安定です。
以下記事で対処法があるので、参考にしてください。
参考サイト
メールサーバー構築(Postfix+Dovecot)
メールサーバー間通信内容暗号化(Postfix+Dovecot+OpenSSL+Let's Encrypt+Certbot)
Follow me!